Welcome to my blog, where I write about random topics. Use the "Posts by Tag" section on the left to view my posts sorted by the various interests.

Quote For The Day:

Monday, November 23, 2020

Raising Mealworms

There are plenty of great guides out there on how to raise mealworms (like this! http://www.sialis.org/raisingmealworms.htm) so I won't make this a 100% guide, but rather a few tips on how I do it.


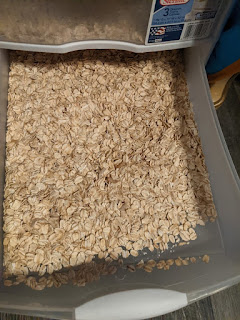
1) My trick is to use a 3-draw tray organizer. I put oats in all three trays. In the first tray goes the container of mealworms (minus the sawdust they're packed in, of course). I like giving them potato slices for hydration, as apples seem to rot and mold too much.


2) When the worms go to larva stage, I pick them out and move them to the second tray. Since the larva are the same color as the oats, and harder to see, I started putting them on a shallow dish inside the tray just so I don't disturb the larva for the next part.


3) After the larva turn to beetles, I scoop them up and move them to tray 3. This way they won't munch on anything they're not supposed to. Eventually the beetles will die after they've served their life purpose, so just pick them out and throw them away. After all the beetles are gone, tray 3 is about to become your new tray #1, the worm tray.


Eventually, the worms will consume all the food or the "trash" in the bottom of tray one will simply need to be tossed out and replaced.  With my system, this way you're not worrying about if you're tossing out any eggs because there were no beetles in there! Since tray 3 is rotated down to tray 1 position, now you can put some new oats in the new beetle tray, aka tray 1.

You now have a live colony of mealworms that will feed your pet while replenishing itself. :D

Saturday, July 27, 2019

Eating to beat Cancer

Sorry, long post.... so I really didn't want to ruin anyone's 4th of July, but after my research I'm making a few changes to my own diet, too. Starting with cutting out known CARCINOGENS!

I hear people say, well I know something will kill me, so I may as well die happy, doing/eating the things I love. Friends let me tell you, after seeing 4 cases of cancer back to back, recently, IT IS NOT WORTH IT. I mean, I'd rather die happy than with great suffering, who wouldn't. So read on for more about relatively easy changes we can all make and why, if you will, to help yourself. Because I care about YOU, and ME.

*Grilling meats (but not veggies) causes carcinogenic byproducts to form.
*Baked at high temperature is also bad. Slow cook meats instead.
*Don't deep fry.
*Especially don't reuse oil - it destabilizes and turns rancid which damages your DNA. (One of the ways that provides cancer cells an opportunity to move in - more on that later.)
*Don't heat oils to smoking, or hotter. Releases toxic fumes and trans fats. Cook with EVO below smoking point.
*Use oven or stovetop to heat foods, as microwaving regularly is bad because of buildup of a harmful polymer from the high heat changes.
*Processed meats and foods are bad.
*Red meat is bad. Try to eliminate or cut down most of it.
*Try to reduce white flour and white rice.
*Excessive amounts of sugar/salt and oily foods.

Four cases.
1) Charles got too much sun damage without sunscreen, over time. (If he only knew then what we know now.) Unshielded sunshine is one of the most harmful factors that damages our DNA (even in your car!)
2) Hope. I think it was dietary/weight in her case. If you are considered overweight, shedding pounds (especially by kicking SUGAR to the curb) will start lowering your risk.
3) Drew. Well we don't know why or how he got his, guessing chemical exposure, or hereditary? Many chemicals, even gas pump vapors, damage your DNA.
4) And, Darren. Lung cancer, probably from cigarettes. Long term smoking, per Drew's doctors, is the leading cause of this type cancer. But quitting smoking immediately improves your odds. Many harmful chemicals in cigarettes damage your DNA.

If you make a few changes, you CAN significantly improve your chances of living to let something ELSE take you out that isn't so terrible! Please. Save yourself. And your next generation. DNA damage can be passed on.

"We all have cancer growing in our body. Every single one of us, even you. ... Up to 10k mistakes occur in the DNA of dividing cells in your body every day ... Most of them never become dangerous. ... Every single type of tumor (even "liquid" tumors like leukemia, etc) must have angiogenesis to grow beyond a pinpoint size."
You can get a genetic test to test for hereditary cancer risks, but "Up to 90-95% of cancers are linked to exposures from the environment and our lifestyles."
Our bodies repair most of the damage on its own, and some foods help the speed & efficiency of the repair process. Or they just prevent the damage.
But what lets cancer take hold? Immune system weakened, invaders take effect where undetected (treated w/ immunotherapy). Or, overactive immune system: autoimmune diseases, which results in inflammation.

I'm trying to cut out the bads, and add in the goods -- the Cancer and Disease Fighters. This book is a vast resource of what foods will starve those tumors of their blood source and prevent them from ever having a chance to take a hold. And the foods are not out of the ordinary. You'd be surprised.

Sugar by itself isn't the carcinogen. But "Being overweight causes hazardous inflammations. ... This increased immune response causes the body to generate excessive inflammation."
This is what starts trouble.

Well that's my soapbox for now. Some of these are harder than others, like bacon, ham, and beef... And microwaved lunches. I have a big change there. I'm a 3-4 day a week Teleworker right now so it just got easier. I have to adjust my work lunch convenience, though. Are you gonna change? What'll be your hardest sacrifice to make for yourself?


Safe Vaping

Vapers, please research and be aware. The danger is in certain flavorings, which contain diacetyl, according to what I've been reading up on. Read a reputable article below about how this was discovered (popcorn "butter" flavoring, originally).
Research and buy diacetyl free vape juice or flavorings, please! Keep it safe.
https://www.google.com/search?q=vape+flavors+without+diacetyl

"a scarring of the tiny air sacs in the lungs resulting in the thickening and narrowing of the airways....serious lung disease that causes coughing, wheezing and shortness of breath, similar to the symptoms of chronic obstructive pulmonary disease (COPD)."
https://www.lung.org/about-us/blog/2016/07/popcorn-lung-risk-ecigs.html

And if you like to mix your own, you can buy DIY flavors that are also diacetyl free...
Example
https://liquidnicotinewholesalers.com/e-juice-flavoring.html?dir=asc&limit=5&mode=list&order=weight&p=18

Locals, shop at Bama Vapor . Their brand is diacetyl free according to the owner. I talked to him today while picking up nicotine free flavors for Drew!
http://bamavapor.com/

We've learned that nicotine causes problems with the pancreas. It's another reason to try and wean off it if you can.
Thursday, May 4, 2017

Yarn Ball Winding

Do you ever get yarn in hanks like this, and find that it's impossibly difficult to work with?  All you need to do is wind it up into balls!


You'll need two things. First, this is called a swift.


And second, this is called a yarn ball winder. You can buy them at craft stores.


You use these tools to make nice, neat little cakes of yarn so that you won't end up with cranky, tangled yarn as you use it.  

Nobody's got time for that!!!

Attach the yarn ball winder to a steady surface. Put a book under it to add stability if needed.

Put the hank on the swift and find the loose end.

Put the loose end into the winder and start winding. 

Sometimes you may find that you grabbed the wrong loose end and the yarn will get cranky as you wind, and fall off the swift. But just put it back on and try to untangle the problem, or you can pull the yarn off the winder and start again with the correct end if you weren't too far along yet.


 As you wind, the yarn will look like this.

 Ahh! Isn't that much better? Insert something like a carboard toilet paper holder through the center when you remove the cake from the winder, to keep it separated properly inside.

And now you can use your yarn without spending time to untangle and tame it.

Now, visit some other neat blogs!

DIY Bra Extender

I had some old bras I just didn't want to throw away, when I changed sizes, or perhaps thought one was not so comfy or starting to wear out, and it got pushed to the side. This week I finally decided to DO something with them!

Part of the reason I had several in the wrong size is I used to WEAR the wrong size. Before I got fitted, and discovered what size I am SUPPOSED to be wearing, I bought one in larger inches around because it felt better. However the straps were always falling off my shoulders! How many of you have this problem!?  Well, the solution was to go DOWN a size. However it felt too tight and I can't tolerate that. So I simply bought a bra extender at the craft store.  Problem solved!

They're not terribly expensive or anything, but why buy them when you literally have them laying around the house for FREE, if you have any old bras you're going to throw out? All you need to do is cut and stitch.  Here's how!

First, cut the ends off.


I also cut the tags out of the way on mine.


Observe how the hooks go at one end, and the loops go at the other.


Now, lay them together like this


and stitch them together.


Before you trim off the ends, flip it over and do a zig-zag stitch to help flatten down the seam and make it more comfortable to wear.


Now trim.


You could trim it then zig zag the parts down but I found that it was far harder to sew when doing it that way because bra material is so stretchy.

Attach to bra!  Tada!  Now you can adjust your bra to fit more comfortably without having the straps fall off your shoulders.


If it's not perfect, such as one part is wider than the other, it's not going to matter. Just hand-wash these little DIY bra extenders and wear whenever you have a bra that's fitting just a bit too tight.

Now, visit some other neat blogs!


Saturday, March 11, 2017

Rockhounding

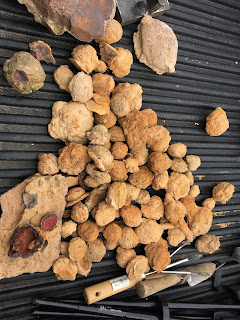
I haven't really used this blog since Facebook really took off, but I guess I should still try to remember to post stuff here. It sure is easier to keep up with. We have resurrected our Rockhound interests lately when we finally got word from a friend about how the local lapidary club works, where they get together, and all that. So we went to our first meeting last month, followed by our first quarry hunt with the group last month! We found a lot of neat things.  We went to our second meeting this month and found out about a member's sale, where we went today and purchased our first rock-cutting equipment. We also got a lot of pretty shiny things, and some that will be once we practice with them! I say we, but David will really be the one cutting. I need to get the tumblers back into production, order new grit, etc. I need to learn how to do some wire wrapping and such so that I can help do stuff with the rocks we get, after they become all shiny and pretty. :)


Some of the stuff we got at the quarry:

Pretty rocks, already smooth, looks polished when wet

Petrified wood

Indian paint pots


Tuesday, March 24, 2015

Compost

1) Compost methods.  Either you compost in batches, or adding to it continuously. Buy a composter based on what it's designed for - some might be designed specifically for batches only.

2) Content. Compost should consist of a good mix consists of three parts "brown" materials (such as dead leaves that are high in carbon) and one part "green" materials (such as fresh grass clippings and garden prunings that are high in nitrogen).
Compost should be warm (except in winter cold months), and moist but not soggy. Turn regularly to keep oxygen flowing through, and it won't smell as bad as when materials decompose without oxygen.
There is a chemistry to composting. If you have the correct balance you can throw it all in, in a batch, and let it process at once. Otherwise you're adding to it over a course of time, but must still work to achieve a balance in the composition of the compost contents.

3) Materials.

DO COMPOST:
Grass clippings
shredded leaves
garden debris
straw
plant residues from garden clean up
kitchen items:
paper coffee filters
old fruits and vegetables
Manure - Waste and bedding from non-carnivorous pets should be fine.
wood ash
unused cat litter
sawdust can be composted, but it is VERY carbon rich, and should be limited 30:1 to nitrogen content. It just takes a long time to break down.

DO NOT COMPOST:
weed seeds
diseased plant materials
fats
oils
bones
leftover salad if it has dressing on it
potato salad and other similar foods
bread products
heavily coated or printed paper
human or animal feces
meat products
milk products
rice
stubborn garden plants (Dandelions, ivy and kudzu - etc)
Used personal products
walnuts
napkins and paper towels if they contain content that should not be composted
wet paper - not preferred to dry
coal or charcoal ashes
lime peels
lime
non-biodegradable materials
toxic materials
colored paper
bird droppings - may contain disease or weed seeds

COMPOSTABLE, BUT ONLY WITH CAUTION:
Milk, yogurt, cheese - see here for more http://www.cleanairgardening.com/how-to-compost-meat.html
Weeds - let dry out first
Diseased plants - if your compost gets to over 135 degrees F for a few days to kill the diseases
Sod - again only if the pile gets hot, to keep the grass from growing in the compost